
In the world of system administration and remote server management, Secure Shell (SSH) stands as a cornerstone protocol. It enables encrypted communication between a client and a server, allowing administrators to execute commands, transfer files, and manage systems securely over untrusted networks. However, despite its name, SSH isn’t inherently secure by default—its configuration determines just how resilient it is against attacks. For anyone managing Linux servers, whether you’re a developer deploying code, a freelancer maintaining client infrastructure, or an educator running lab environments, understanding how to properly configure SSH is not just a technical detail—it’s a critical layer of defense.
Why SSH Security Matters
Every server exposed to the internet with SSH enabled becomes a target. Automated bots constantly scan IP ranges, attempting to exploit weak passwords, default configurations, or outdated software. A single misconfigured SSH daemon can lead to unauthorized access, data theft, or the server being turned into a launchpad for further attacks. The consequences aren’t theoretical—security reports from CVE Details regularly list vulnerabilities in OpenSSH, some of which allow remote code execution or privilege escalation.
Beyond external threats, internal risks like accidental exposure of private keys or overly permissive access controls can compromise even the most well-intentioned setups. The goal isn’t just to keep attackers out, but to minimize damage if a breach does occur.
Let’s go over the fundamental procedures that turn SSH from a useful tool into a strong, secure gateway.
Use Key-Based Authentication Instead of Passwords
One of the most impactful steps you can take is disabling password authentication and switching entirely to SSH key pairs. Passwords, even strong ones, are vulnerable to brute-force and dictionary attacks. Keys, on the other hand, are cryptographically secure and far more difficult to guess.
To set this up, generate a key pair on your local machine:
ssh-keygen -t ed25519 -C "your_email@example.com"
The -t ed25519 flag specifies the use of the Ed25519 algorithm, which offers strong security with shorter key lengths compared to RSA. If your system doesn’t support Ed25519, RSA with at least 4096 bits is acceptable:
ssh-keygen -t rsa -b 4096 -C "your_email@example.com"
Once generated, copy the public key to your server using:
ssh-copy-id user@your-server-ip
Then, disable password authentication by editing the SSH daemon configuration file:
sudo nano /etc/ssh/sshd_config
Locate or add the following line:
PasswordAuthentication no
Restart the SSH service afterward:
sudo systemctl restart sshd
Now, only users with the correct private key can log in. This dramatically reduces the attack surface.
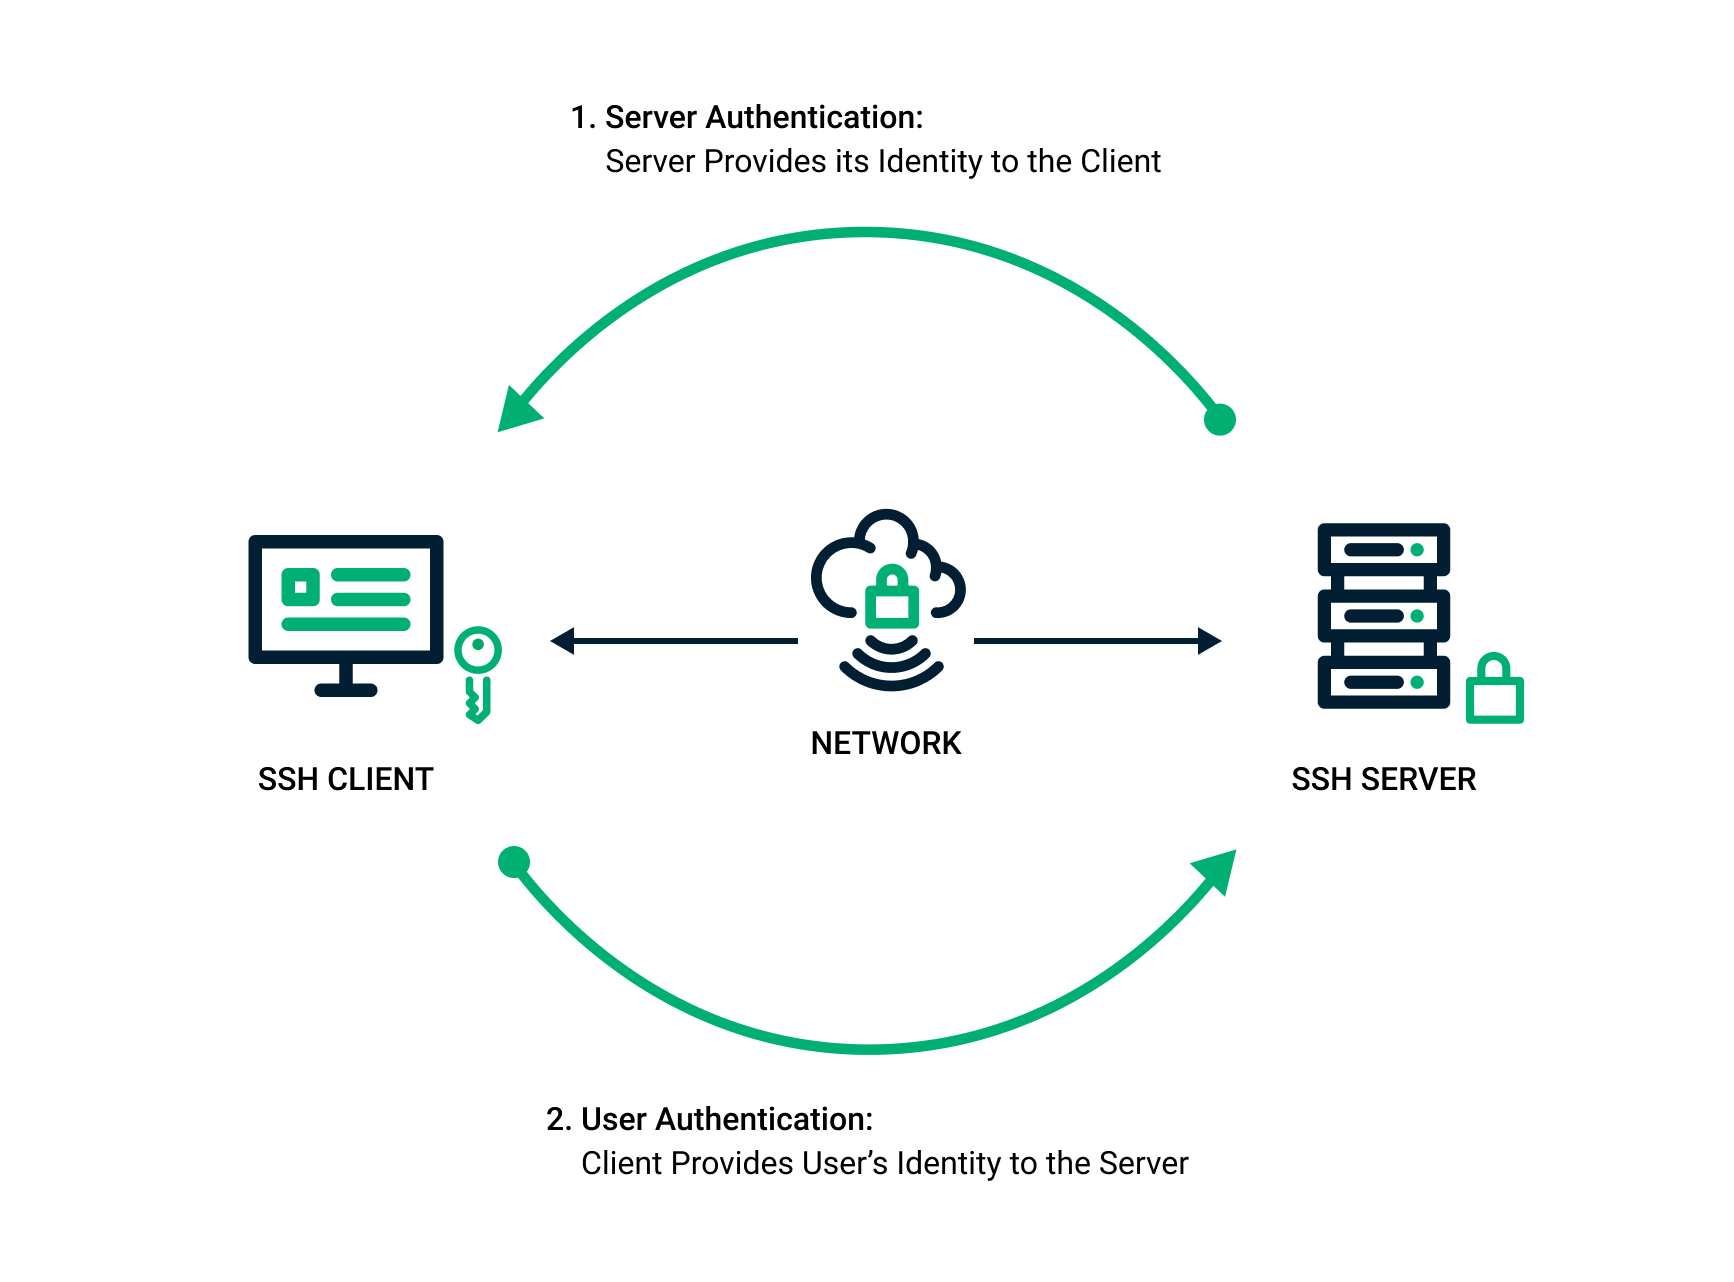
Visual representation of public-private key exchange in SSH.
Change the Default SSH Port
By default, SSH listens on port 22. This well-known port is a magnet for automated scanning tools. While changing the port doesn’t provide real security (security through obscurity is not a strategy), it significantly reduces noise in your logs by filtering out casual bots.
To change the port, edit /etc/ssh/sshd_config and modify the Port directive:
Port 2222
Or any other unused port above 1024. After making this change, ensure the new port is allowed in your firewall. For example, with ufw:
sudo ufw allow 2222/tcp
And reload the SSH service. Be cautious: always keep a backup session open when modifying SSH settings to avoid locking yourself out.
Note: If you’re on a cloud provider like AWS or Google Cloud, you’ll also need to update the security group or firewall rules to allow traffic on the new port.
Disable Root Login
Allowing direct root login over SSH is a dangerous practice. If an attacker gains access to the root account, they have full control over the system. Instead, use regular user accounts with sudo privileges to perform administrative tasks.
In /etc/ssh/sshd_config, set:
PermitRootLogin no
If you must allow root access temporarily (e.g., for recovery), use prohibit-password instead:
PermitRootLogin prohibit-password
This allows root login only with SSH keys, never with a password. But for most environments, disabling root login entirely is the safer choice.
Limit User Access with AllowUsers or AllowGroups
Not every user on the system should have SSH access. Restrict who can log in by explicitly listing authorized users in the configuration file:
AllowUsers alice bob charlie
Alternatively, use AllowGroups to permit only members of a specific group:
AllowGroups ssh-users
First, create the group and add users:
sudo groupadd ssh-users
sudo usermod -aG ssh-users alice
Then reference it in sshd_config. This method is especially helpful in team environments where multiple administrators need access—permissions can be managed centrally.
Use Strong Encryption and Disable Deprecated Protocols
SSH has evolved over time, and older versions of the protocol or weak ciphers may still be enabled by default on some systems. Ensure your server uses modern cryptographic standards.
OpenSSH supports configuration of ciphers, MACs (Message Authentication Codes), and key exchange algorithms. In /etc/ssh/sshd_config, explicitly set strong options:
KexAlgorithms curve25519-sha256
Ciphers chacha20-poly1305@openssh.com,aes256-gcm@openssh.com
MACs hmac-sha2-512-etm@openssh.com
Also, disable SSH protocol version 1, which is obsolete and insecure:
Protocol 2
These settings prioritize algorithms recommended by modern security standards. You can verify your server’s compliance using tools like SSH Scan from Mozilla.
Enable Two-Factor Authentication (2FA)
Even with key-based authentication, adding a second factor enhances security. Google Authenticator can be integrated with SSH using PAM (Pluggable Authentication Modules).
Install the PAM module:
sudo apt install libpam-google-authenticator
Then, for each user, run:
google-authenticator
Follow the prompts to set up a time-based one-time password (TOTP) linked to an authenticator app.
Next, configure PAM to require 2FA. Edit /etc/pam.d/sshd and add:
auth required pam_google_authenticator.so
Then, in /etc/ssh/sshd_config, enable challenge-response authentication:
ChallengeResponseAuthentication yes
AuthenticationMethods publickey,keyboard-interactive
Now, logging in requires both the SSH key and a code from the authenticator app. This significantly raises the bar for unauthorized access.
Implement Fail2Ban to Thwart Brute-Force Attacks
Even with strong authentication, repeated login attempts can clutter logs and, in rare cases, expose vulnerabilities. Fail2Ban is a powerful tool that monitors log files and temporarily blocks IP addresses after a certain number of failed attempts.
Install Fail2Ban:
sudo apt install fail2ban
Copy the default configuration to avoid overwriting updates:
sudo cp /etc/fail2ban/jail.conf /etc/fail2ban/jail.local
Edit jail.local to customize settings. For SSH protection:
[sshd]
enabled = true
port = 2222
filter = sshd
logpath = /var/log/auth.log
maxretry = 3
bantime = 86400
This bans IPs for 24 hours after three failed login attempts. Adjust port to match your SSH port.
Restart the service:
sudo systemctl restart fail2ban
Fail2Ban also supports email alerts, custom filters, and integration with firewalls like nftables or iptables.
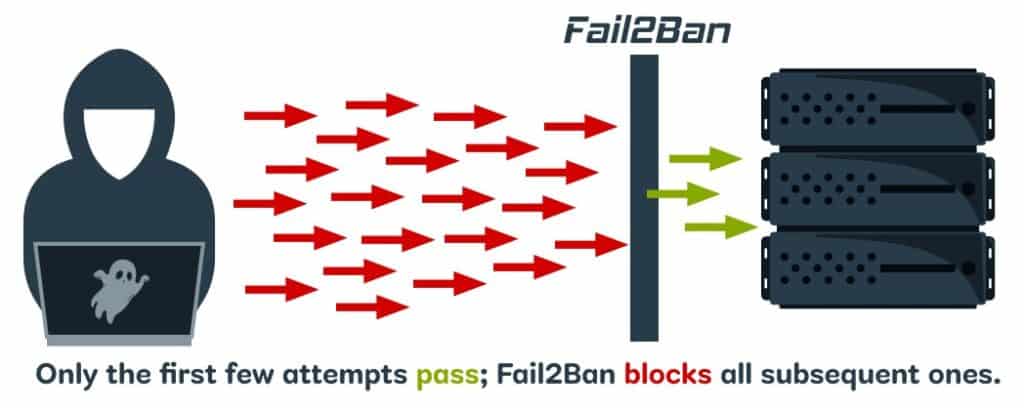
Fail2Ban monitoring authentication logs and blocking suspicious IPs.
Use SSH Config Files for Client-Side Security
On the client side, you can streamline and secure connections using ~/.ssh/config. This file allows you to define host-specific settings, reducing the chance of errors and improving consistency.
For example:
Host myserver
    HostName 203.0.113.10
    User alice
    Port 2222
    IdentityFile ~/.ssh/id_ed25519_myserver
    ServerAliveInterval 60
    Compression no
Now, connecting is as simple as:
ssh myserver
The ServerAliveInterval keeps the connection alive through NAT timeouts, while Compression no disables compression, which can be exploited in certain attacks (e.g., CRIME).
Rotate and Revoke Keys Regularly
SSH keys, like passwords, should be rotated periodically—especially when employees leave or devices are lost. There’s no built-in expiration for SSH keys, so manual management is required.
Keep an inventory of authorized keys in ~/.ssh/authorized_keys. Remove entries that are no longer needed. For larger teams, consider using a configuration management tool like Ansible, Puppet, or Chef to automate key deployment and revocation.
Alternatively, explore certificate-based SSH authentication, where keys are signed by a trusted CA and can include expiration dates. OpenSSH supports this via ssh-keygen -s, allowing you to issue time-limited credentials.
Monitor and Audit SSH Activity
Visibility is key to security. Regularly review SSH logs to detect anomalies. On most Linux systems, SSH logs are stored in /var/log/auth.log (Debian/Ubuntu) or /var/log/secure (RHEL/CentOS).
Use commands like:
sudo grep "Failed password" /var/log/auth.log | tail -20
Or:
sudo journalctl -u ssh -f
To monitor real-time activity.
For long-term analysis, consider forwarding logs to a centralized system using tools like rsyslog, syslog-ng, or SIEM platforms such as Elastic Stack or Graylog. Setting up alerts for unusual login times, geographic locations, or repeated failures can help catch intrusions early.
Harden the Host Environment
SSH security doesn’t exist in a vacuum. A compromised operating system undermines even the most carefully configured SSH daemon. Follow general server hardening practices:
- Keep the system and OpenSSH updated:
sudo apt update && sudo apt upgrade - Remove unnecessary software and services
- Use a firewall (e.g.,
ufw,firewalld) to restrict incoming traffic - Enable automatic security updates where appropriate
- Disable unused SSH features like X11 forwarding and agent forwarding unless required:
X11Forwarding no
AllowAgentForwarding no
Use Bastion Hosts for Additional Isolation
In enterprise or high-security environments, direct SSH access to production servers should be avoided. Instead, use a bastion host—a tightly secured gateway that acts as the single entry point.
Users connect first to the bastion, then from there to internal servers. This limits exposure and allows for centralized logging and access control.
Configure SSH to support jump hosts using the ProxyJump directive:
Host internal-server
    HostName 192.168.1.100
    User admin
    ProxyJump bastion

Host bastion
    HostName 203.0.113.20
    User alice
    Port 2222
Now, ssh internal-server automatically tunnels through the bastion.
Automate Security Checks with Configuration Tools
Manual configuration is error-prone. Use automation tools to enforce and audit SSH settings across multiple servers.
For example, with Ansible, you can create a playbook to standardize SSH configurations:
- name: Secure SSH Configuration
  hosts: all
  become: yes
  tasks:
    - name: Update SSH config
      lineinfile:
        path: /etc/ssh/sshd_config
        regexp: "{{ item.regexp }}"
        line: "{{ item.line }}"
      loop:
        - { regexp: "^#?PasswordAuthentication", line: "PasswordAuthentication no" }
        - { regexp: "^#?PermitRootLogin", line: "PermitRootLogin no" }
        - { regexp: "^#?Port", line: "Port 2222" }
      notify: restart ssh

  handlers:
    - name: restart ssh
      systemd:
        name: ssh
        state: restarted
This ensures consistency and reduces drift across your infrastructure.
Educate Users and Enforce Policies
No technical measure works if users bypass it. Educators and team leads should train users on SSH best practices:
- Never share private keys
- Use strong passphrases for key files
- Store keys in secure locations (e.g., hardware tokens like YubiKey)
- Avoid using SSH from untrusted devices
Consider requiring SSH audits during onboarding or offboarding processes.
Final Thoughts: Security Is a Process, Not a Setting
Configuring SSH securely isn’t a one-time task. Threats evolve, software updates introduce changes, and human error remains a constant factor. The practices outlined here—key-based authentication, port changes, access restrictions, 2FA, monitoring, and automation—form a layered defense strategy.
But beyond tools and configurations, the real foundation is awareness. Whether you’re a solo developer managing a VPS or part of a large organization, taking ownership of your server’s security posture starts with asking the right questions: Who can access this system? How do we detect suspicious activity? What happens if a key is compromised?
By integrating these best practices into your daily workflow, you’re not just protecting a server—you’re building a culture of responsibility and resilience. In an age where digital trust is fragile, that’s one of the most valuable assets you can cultivate.
For further reading, the OpenSSH documentation and the CIS SSH Benchmark provide detailed guidance on secure configurations. Additionally, tools like Lynis can perform comprehensive security audits on your Linux systems, including SSH settings.
Security isn’t about perfection—it’s about persistence. And with SSH, every small improvement adds up to something far stronger than the sum of its parts.


")